How to Build a Home Shooting Range: The Ultimate Guide
There’s nothing quite like walking out of your back door and plinking in the comfort of your own property. Building a home shooting range is relatively simple, but planning and preparing before breaking ground will save you a headache.
This guide will help you design, prepare, and build your home shooting range.
Step-by-Step Guide on Making a Home Shooting Range
Making a home shooting range is a smart long-term investment. Range fees accumulate over time, and if you develop your range to last, it’s the perfect solution to training economically and efficiently.
Note: Observing safety rules, mitigating ricochet risks, and putting up signs are crucial to your home gun range’s overall success.
Here are the steps to designing and building your home shooting range:
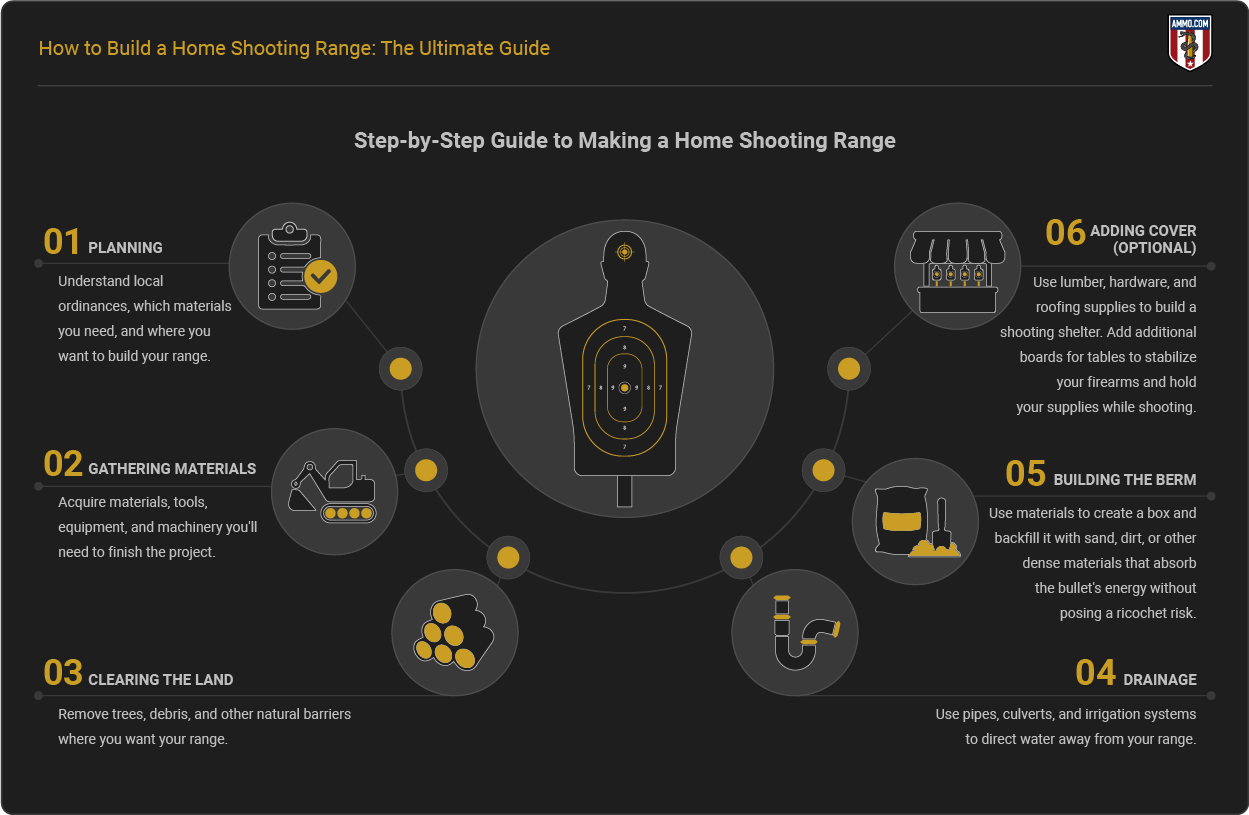
Step 1: Planning
Careful planning is crucial to success. Skipping this critical step can turn your home shooting range vision into an unnecessary burden – and in the worst-case scenario, you may have to abandon the project altogether.
Create a checklist and work through it before investing:
- Understand local ordinances and locate buried lines, cables, and septic tanks.
- Map out your range (although a well-built berm, or an artificial embankment, that will stop bullets, ensuring no homes or structures are behind it is necessary to prevent tragedy).
- Gather cost-effective and readily available materials.
- Acquire whichever tools you’ll need to complete the job.
Step 2: Materials
The materials you’ll need depend on the location and terrain of your shooting range. After a property assessment, determine whether (A) you’ll need a berm, (B) the land needs to be cleared, and (C) you would like shooting stands (covered or uncovered).
Although a natural backstop may suffice in hilly areas, a berm is still highly recommended for safety reasons. Should you choose to forego a berm, you’ll likely need heavy equipment (e.g., a backhoe, skid steer, etc.) to level your range and possibly lumber, gravel, chainsaws, hardware, and, of course, target stands.
A flatter area requires a shooting berm (which we’ll discuss in greater detail below). You will need sand or dirt, lumber (or another dense material for the backing), and hardware.
Finally, choose your targets. Do you want target stands (which require lumber, paper targets, and a lot of staples) or steel targets (which last longer)?
The materials needed for your shooting range may vary, but here is a checklist of the most commonly used items:
Materials Checklist:
- Heavy machinery (for leveling land)
- Tools (for clearing land and building a berm and/or shooting structure)
- Pipe and/or gravel (for drainage)
- Dirt or sand (for a berm)
- Lumber (for the berm and/or shooting structure)
- “No Trespassing” signs
Step 3: Removing Barriers
Trees may seem like an acceptable backstop for your shooting range. This isn’t the safest option, however. It's better to remove trees, brush, and any other obstacles that impede your line of sight.
After planning and gathering materials, clear the land.
Step 4: Drainage
Don’t overlook this step. You don’t want your home shooting range to wash away. Digging trenches and installing pipes is a simple way to redirect water away from your shooting berm.
Rocks and gravel are excellent additions to combat mud. For best results, spread them from the entrance of your firing range to the berm.
Step 5: Build the Berm
Fortunately, constructing a DIY shooting berm isn’t a difficult feat.
The NRA recommends building a berm for shooting that is at least 12’ high and 4’ wide at the top. Build a three-sided structure using lumber (you can repurpose crossties or boards) to hold dirt or sand. Then, backfill the structure with dirt or sand.
Inspecting your berm periodically is crucial to range safety and ensuring your bullets do not escape your shooting range. Plan regular maintenance, such as checking for erosion and safety hazards.
Note: Dirt may harden and present a risk of causing a ricochet over time. To combat this risk, shoot farther back (at least 10 yards for pistol ranges).
Step 6: Build a Covering (Optional)
If you’re feeling fancy, add a covering and shooting tables.
Gather lumber and hardware. Set posts in concrete for added stability. Then, use lumber and roofing materials (shingles, repurposed tin, etc.) to add a top that will withstand the elements and your shooting activities. Secure boards to posts using hardware for easy makeshift shooting tables.
How to Design an Outdoor Shooting Range
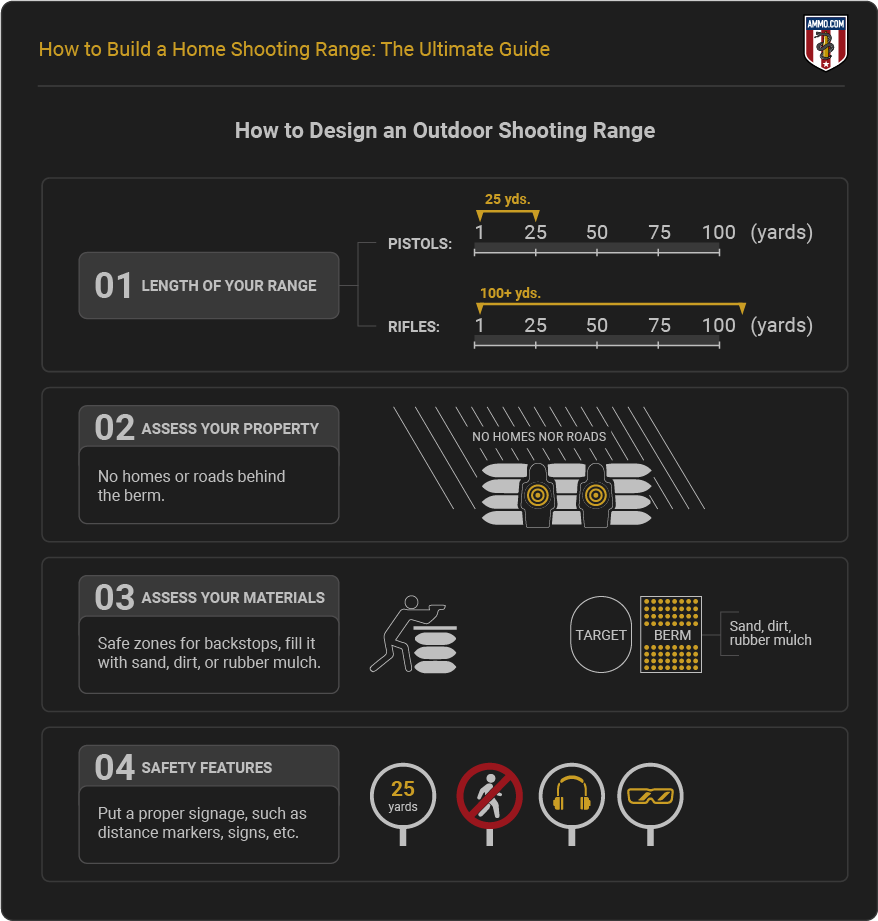
Designing your outdoor shooting range is an exciting endeavor. Naturally, considering safety, practicality, and your range’s location, size, and layout is key to accomplishing your goals.
- Begin designing your range by assessing your property. Where is the best place to direct hot lead at high velocities? That is where you should build your shooting berm.
- Next, decide how long you can make your range. The size of your property and the cartridges you prefer firing should be considered in the design (e.g. 100+ yards for rifles or 25+ yards for pistols).
- Assess available materials. Determine which materials you can obtain, which ones you already have, and which ones will help you achieve your range goals. After all, the only thing you really need is a berm (lumber, tin, sand, rubber mulch blocks, etc.).
Can You Make a Shooting Range on Your Property?
A homemade gun range is technically doable anywhere. However, this doesn’t mean it is practical. “Can” and “should” are often two separate concepts.
The biggest hurdle working against your DIY shooting range goals are local ordinances. Noise ordinances, shooting ordinances, HOAs, and ordinances that prohibit shooting within a specific distance of a road can all render your shooting range inadvisable. Contact your local officials to ensure there are no ordinances or prohibitions on home gun ranges. Then, check back periodically for any new ordinances.
For the purposes of this section, we’ll assume no ordinances are hindering your dreams, and you’re free to move forward.
Next, do you have the skills, time, and financial resources to install a shooting range on your property? Plan an achievable range while considering your strengths and limitations. Berms are optional if the terrain stops bullets, and drainage is only necessary if your range's location collects water.
Finally – and this isn’t a requirement, but a helpful suggestion – let your neighbors know you’re constructing a range to foster better relationships and prevent misunderstandings or discord. If you’re really lucky, you may even be able to build an entire gun club!
Wrap-Up
Of all the projects we dream of doing on our properties, building a shooting range is one of the simplest and comes with the greatest reward.
Assuming no local ordinances are raining on your at-home range days, start installing your homemade gun range as soon as possible!

Infographics
- Are Guns & Ammo The New Gold? Why More Americans Are Arming Themselves
- The Greatest Gun Salesman In America: President Barack Obama
- Shooting Straight: How Both Presidential Candidates Have Changed On Gun Control
- President Obama: (Still) The Greatest Gun Salesman in America
- An Inconvenient Truth: How The Obama Administration Became Earth's Largest Arms Dealer
- Armed Drones: President Obama's Weapon of Choice
- COVID-19 Data Study: Ammunition Sales Continue to Soar in Response to Coronavirus Panic
- Data Study: 18 Months of Ammo Sales during a Pandemic, Protests, and the Biden Presidency
- Data Study: U.S. Ammo Sales Surge Following Russian Invasion of Ukraine
- Most Gun-Friendly States
- Worst States to be a Gun Owner
- Children & Firearms: Definitions and Demographics Make All the Difference
- Urban Violent Crime & Legal Gun Ownership
- Gun-Free School Zone Laws & School Shootings
- Gun Control Laws and Enforcement Trends
- Gun Ownership by State
- How Many Gun Owners are in America?
- Concealed Carry Crime Stats
- Accidental Shooting Statistics: A Review of Unintentional Firearm Deaths
- America's Stolen Guns: A Silent Contributor to Gun Crimes in the U.S.
- Gun Violence Statistics: Comprehensive Look at the Data
- Gun Laws vs. Crime Rates: A Comprehensive Analysis
- Gun Death Statistics by Caliber: A Review of Calibers and Crime
- Anti-Gun Control Arguments: Facts Gun Control Lobby Suppress
- Guns in the Home Statistics: The Effects of Firearms in the Home
- Gun Deaths in the US: Analyzing At-Risk Demographics
- How Many Guns in the U.S.: All About America's Firearms
- Gun Facts in the U.S.: The Reality of Firearms in America
- Defensive Gun Use Statistics: America's Life-Saving Gun Incidents
- Correlation Between Mass Shootings and Prescription Drugs
- Gun Ownership by Gender: Closing the Gender Gap
- Murders by Weapon Type: Statistics
- Gun Violence Among Black Americans: Statistics
- The Ultimate Hunting Caliber Chart: Best Cartridge Per Species
- How Old Do You Have to be to Buy a Gun: A State Guide
- Most Popular Guns in the U.S.: The Must-Have Guns
- Stray Bullet Deaths: Accident and Injury Statistics
- Mass Shooters by Race: Demographics of Assailants
- Ammunition Limits By State: How Much Ammo Can You Buy?
- Why Do Americans Own Guns?
- How Many Americans Want Stricter Gun Laws?
- How Many Households in the U.S. Have a Gun?
- What Percentage of Gun Deaths are Suicides?
- Average Age of Mass Shooters in the U.S.
- Firearm Ownership in America by Year
- US Firearms Deaths Per Year: A Collective Report
- Percentage of Americans Owning Guns
- Texas Gun Ownership: Total Numbers, Trends, and Most Popular Guns
- Gun Ownership Statistics Colorado: Trends & Numbers
- Hunting Accident Statistics (Causes & Trends Per Year)
- Banned Guns & Ammo List: A Review by State
- 3D Printed Gun Laws By State
- How To Build a Home Shooting Range: The Ultimate Guide
- States With the Highest Murder Rates
- Best Self-Defense Weapons for Women
- Easiest States to Buy a Gun
- Cities with the Lowest Crime Rate
- Oregon Homicide Rates
- Chicago Homicide Rate
- How Much Does a Suppressor Reduce Noise
- Texas Homicides: Statistics and Trends
- California Homicides: Rates Per 100K
- Florida Murder Rate: Statistics and Trends
- Gun Ownership by Political Party
- Mass Shooters by Gender
- U.S. Hunting and Fishing Statistics
- Where Are Silencers Illegal? State Suppressor Laws
- How Loud is a Gunshot?